The Definitive Guide to Filtering Collections in Canvas Apps


When working with Canvas Apps, one of the most essential skills is mastering how to filter collections. Collections are temporary in-memory tables that are perfect for storing, manipulating, and displaying data during the lifecycle of your app. But how do you get the most out of collections, especially when you need to filter data dynamically or apply advanced techniques? Let’s explore every possible way to filter collections as of December 2024.
It's easier and more powerful than you might think!
The Basics of Filtering Collections
At its core, filtering a collection involves using the Filter function to extract rows based on specific conditions. The syntax is simple:
Filter(CollectionName, Condition)
For example, if you have a collection named Products and want to find items where the price is greater than $100:
Filter(Products, Price > 100)
But this is just the tip of the iceberg. Let's dive deeper into more advanced techniques.
1. Using Multiple Conditions
Filtering can include multiple criteria combined with logical operators like And, Or, and Not. For instance, if you want to find products with a price above $100 and in the "Electronics" category:
Filter(Products, Price > 100 && Category = "Electronics")
Or, to filter products that are either electronics or clothing:
Filter(Products, Category = "Electronics" || Category = "Clothing")
2. Dynamic Filtering with User Inputs
One of the most powerful features of Canvas Apps is allowing users to interact with filters. For example, you can let users filter a collection based on text input:
Filter(Products, StartsWith(Name, TextInput_Search.Text))
This creates a real-time search bar where users type text, and the list filters dynamically. Pair this with dropdowns or sliders for even more control:
Filter(Products,
Category = Dropdown_Category.Selected.Value &&
Price <= Slider_MaxPrice.Value)
3. Filtering with Search
The Search function is a powerful way to filter collections by searching for specific text within a column. Unlike Filter, which relies on exact conditions, Search scans a column for a string (case-insensitive) and returns rows that contain it.
Imagine you have a Products collection and want to find all items containing the word "Laptop" in their Name column:
Search(Products, "Laptop", "Name")
This will return rows where "Laptop" appears anywhere in the Name.
Combining Search with User Input
You can make a search bar where users dynamically filter products:
Search(Products, TextInput_Search.Text, "Name")
As users type into TextInput_Search, the app will instantly update the list to show matching products.
4. Filtering with LookUp
LookUp is a cousin of Filter and is perfect for finding a single record. For example, if you need to find the first matching product in a collection:
LookUp(Products, ID = SelectedID)
This works well when you need to bind specific data to forms or labels.
5. Filtering Across Related Data
If your app works with multiple collections or data sources, you can filter based on relationships. For example, to find orders linked to a specific customer in two collections:
Filter(Orders, CustomerID in Filter(Customers, Name = "John Doe").ID)
This technique works best when working with related tables and enhances the relational capabilities of Canvas Apps.
6. Filtering Nested Collections
You might encounter collections that contain nested tables or complex objects. To filter these, use ForAll combined with Filter. For example, if each order contains a nested OrderItems table:
ForAll(Orders, Filter(OrderItems, Product = "Laptop"))
This extracts all items with the product "Laptop" across all orders.
7. Aggregating While Filtering
Sometimes, you need to group data while filtering. Use GroupBy and Ungroup in combination:
GroupBy(
Filter(Sales, Region = "North America"),
"Category",
"CategoryGroup"
)
This groups sales records from "North America" by category, creating a structured result.
8. Filtering with Global Variables
Global variables are great for storing conditions that apply app-wide. For instance, if you want to filter a collection based on a globally selected category:
Filter(Products, Category = gSelectedCategory)
Change gSelectedCategory dynamically, and your filters update instantly throughout the app.
9. Chaining Filters for Complex Scenarios
To handle multi-step filtering, you can chain multiple filters:
Filter(
Filter(
Products,
Stock > 0
),
Price < 200
)
This filters products in stock and further refines the list to those under $200.
10. Real-Time Sorting and Filtering
Combine Filter with SortByColumns to create dynamic, user-friendly lists:
SortByColumns(
Filter(Products, Category = Dropdown_Category.Selected.Value),
"Price",
If(Toggle_SortDirection.Value, Ascending, Descending)
)
This lets users filter and sort products simultaneously with a dropdown and toggle switch.
11. Filtering with Time-Based Criteria
If you need to filter based on dates, leverage the DateValue and Now functions. For example, to filter items created in the last 30 days:
Filter(Tasks, CreatedDate >= DateAdd(Today(), -30, Days))
This is invaluable for task management, reporting, and monitoring time-sensitive data.
12. Filtering with StartsWith and EndsWith
The StartsWith and EndsWith functions allow you to filter rows based on how the text in a column begins or ends.
For example, find customers whose names start with the letter "A":
Filter(Customers, StartsWith(Name, "A"))
This returns rows where the Name begins with "A", like "Alice" or "Aaron".
Or another example, find email addresses ending with ".com":
Filter(Customers, EndsWith(Email, ".com"))
This filters all rows where the Email column ends with ".com", such as "example@gmail.com".
This can also be applied to dynamic filtering:
Filter(Customers, StartsWith(Name, TextInput_Prefix.Text))
Typing "Jo" in TextInput_Prefix would return names like "John" or "Joanne".
13. Filtering with In
The In operator checks if a value exists within a list or collection. It's ideal for relational filters or dynamic matching.
For example, find orders placed by customers in a specific list:
Filter(Orders, CustomerID in [101, 102, 103])
This filters all orders where the CustomerID is 101, 102, or 103.
It can also be used to relate data from two tables. Suppose you have two collections, Orders and Customers. Find orders from customers located in the USA:
Filter(Orders, CustomerID in Filter(Customers, Country = "USA").ID)
This matches CustomerID in Orders to the ID of customers in the USA.
14. Filtering with Distinct
The Distinct function returns unique values from a column, which is useful for filtering duplicates or creating dropdown options.
For example, to generate a list of unique product categories:
Distinct(Products, Category)
This returns a collection of unique values in the Category column.
This collection could be placed in a dropdown as a category selected. Then, with the following filter in a gallery, data could be easily filtered by the User, and it would never need modifications since the categories are directly taken from the data source.
Filter(Products, Category = Dropdown_Category.Selected.Value)
15. Filtering with IsBlank
The IsBlank function identifies rows where a column is empty or missing a value. This is useful for validating data or handling incomplete records.
For example, to find products missing a description:
Filter(Products, IsBlank(Description))
This returns all rows where the Description column is blank.
Or also, to find tasks with assigned owners:
Filter(Tasks, !IsBlank(AssignedTo))
This excludes rows where AssignedTo is empty.
Special Case: Handling Optional Filters
Use IsBlank to ignore filters if no input is provided:
Filter(Products, IsBlank(TextInput_Filter.Text) || StartsWith(Name, TextInput_Filter.Text))
If TextInput_Filter is blank, all products are shown; otherwise, it filters by the input.
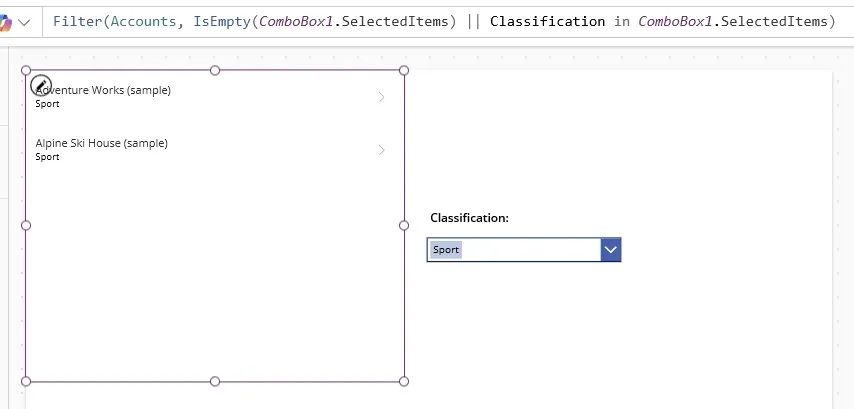
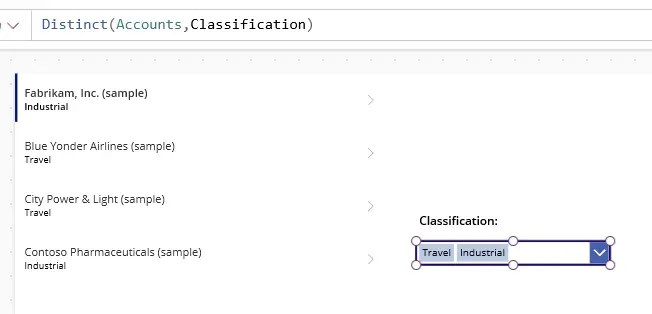
As a final example, in the following screenshot you will see an example using a combination of 5 of the previously mentioned methods!
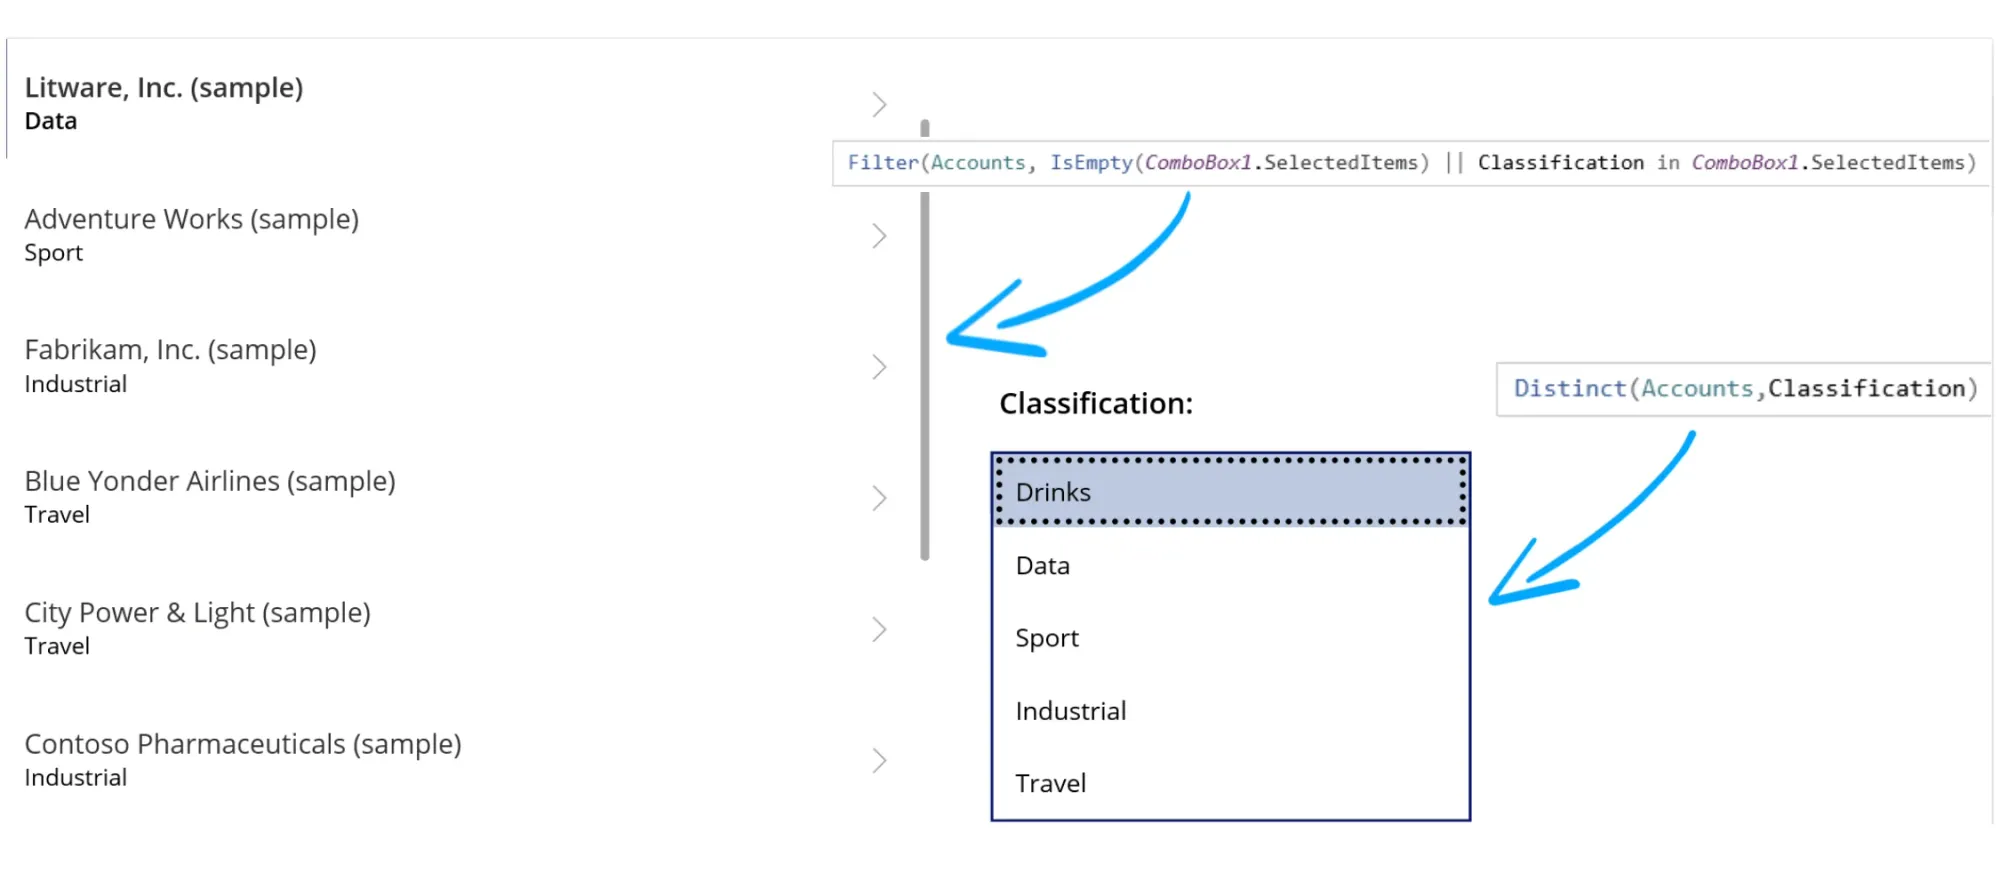
As you can see, the dropdown is using Distinct to obtain all different options in the classification field so that they user can sort by them.
Then, on the gallery there is a filter that only works when the dropdown has something selected, and will show all records that have any of the values selected. This could be further developed so that the records are aggregated by the values selected or show in a specific order, but I think this example is enough to display how all techniques can interact with each other.
Summary
Filtering collections in Canvas Apps is an art and a science. Whether you're working with simple conditions, dynamic user inputs, or complex relational data, Power Fx provides a powerful and flexible toolkit to meet your needs.
Now it's your turn to try these techniques! Open Power Apps, create a new collection, and experiment with these filtering methods. You’ll be amazed at how dynamic and user-friendly your apps become. If you have questions or ideas, drop them in the comments—we’d love to hear from you!