
From Vibe to Production: Turning AI Mockups into Real Power Apps
Learn how to turn a Power Apps Vibe prototype into a Code App, connect Dataverse and Azure Logic Apps, and deploy and maintain it with proper ALM.

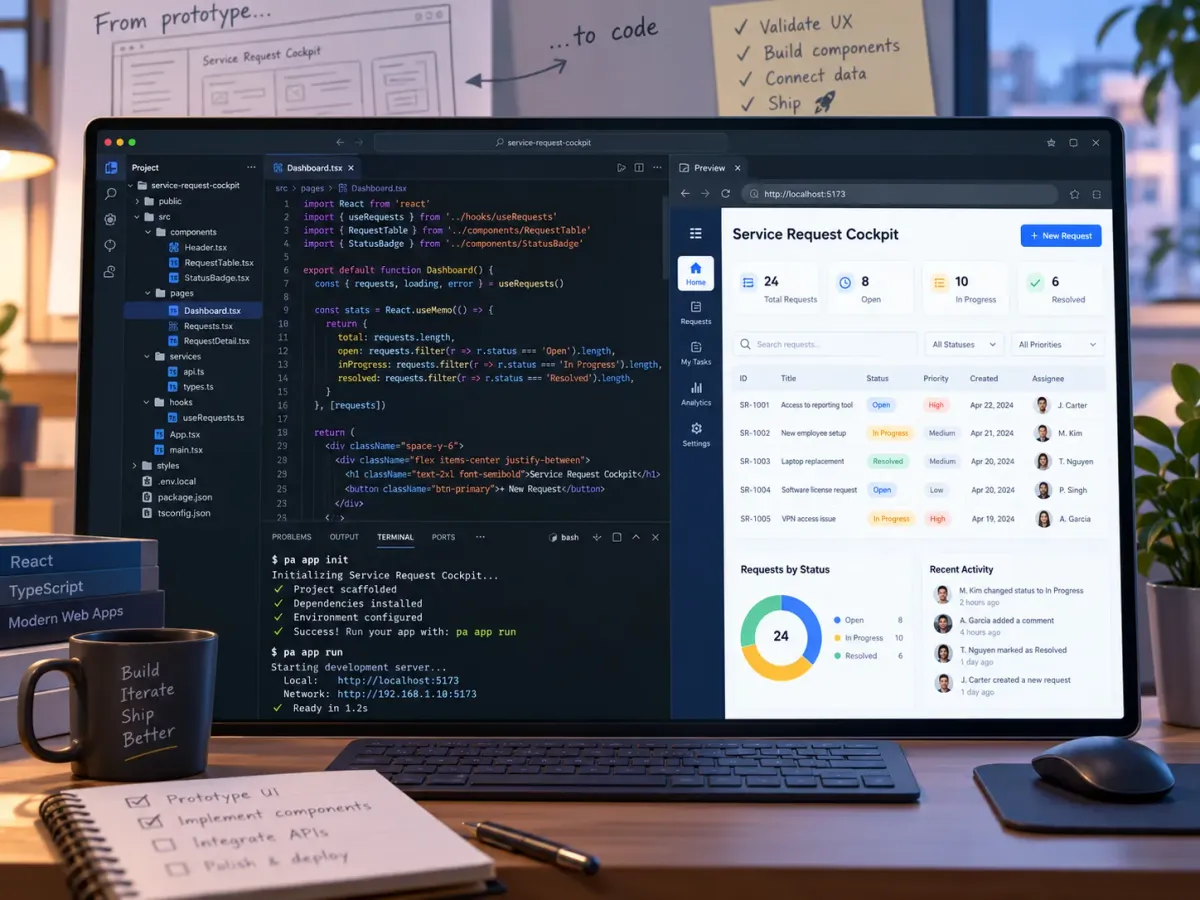
How to go from a Power Apps Vibe prototype to a fully developed Code App with Dataverse, external integrations, and proper ALM.
Ever spent hours discussing how an application should look, only to discover that the business had something completely different in mind?
You prepare mockups, go through multiple meetings, adjust the requirements, and eventually start building. Then, when you finally show the application, someone says:
"That's not exactly what I imagined."
Sounds familiar?
Well, what if we could skip a good part of that process and let the business interact with a working prototype almost immediately?
That's one of the things I find particularly interesting about the new Power Apps Vibe experience.
Instead of manually creating screens and controls, we can describe an application using natural language, let AI generate the initial version, and refine it through additional prompts.
Need another screen? Just ask.
Want to change the layout? Another prompt.
Need some sample data to show how the application would work? Vibe can help with that too.
Pretty cool, right?
But there's one question that immediately comes to mind.
What happens when the prototype is approved and we need to turn it into an actual business application?
Because having something that looks good is one thing. Connecting it to Dynamics 365, integrating an external ERP, managing deployments, and maintaining it over time is something else entirely.
And this is where Power Apps Code Apps come into play.
In this article, we'll explore how we can use Vibe for rapid prototyping, convert the resulting application into a Code App, connect it to real systems, and manage its lifecycle using familiar development tools.
Let's get started!
What Exactly Is Power Apps Vibe?
Power Apps Vibe is Microsoft's new AI-powered app-building experience, currently available in preview.
The idea is simple: instead of starting with an empty application, we describe what we want to build.
Vibe can then generate an application plan, propose a data model, and create an interactive application based on our requirements.
The interesting part is that we're not just generating a static picture of an application.
We're generating something we can actually interact with.
The experience includes three main areas:
- Plan: Define what the application should do, review the proposed functionality, and refine the requirements.
- Data: Review generated tables, relationships, and sample data.
- App: Preview the generated application, interact with it, and continue improving it through prompts.
We can even view the generated source code, although development within the Vibe experience is primarily handled through AI-assisted changes.
This creates some interesting opportunities.
Imagine sitting with a business user and asking them to describe the application they need.
Instead of spending the next week preparing a mockup, we could generate an initial experience, show it, and start discussing what needs to change.
And because we're working with something interactive, users can provide much more useful feedback.
There is one important consideration, though.
Power Apps Vibe is currently a preview feature.
As of September 2026, it requires a supported non-default environment, Copilot enabled for the tenant, and is available in English in selected regions: US, Australia, Asia, and India.
Preview features may also have limitations, and they shouldn't automatically be treated as production-ready.
For me, this makes Vibe particularly interesting as a prototyping and requirements-validation tool.
But let's explore what happens after the prototype has been approved.
Let's Build Something!
For our example, let's imagine a company wants a new application for its customer service team.
The team needs a simple interface where agents can see open service requests, identify high-priority issues, and retrieve information about customer orders.
We'll call it the Service Request Cockpit.
The application should include:
- A dashboard showing open, overdue, and high-priority requests.
- A list of requests with filtering and searching.
- A detail screen displaying request and customer information.
- An order-status panel showing information from an external ERP system.
Now, we could start by creating Dataverse tables and writing the UI.
But do we really need to do that before the business agrees on how everything should work?
I don't think so.
Step 1 — Create the Initial Prototype
Let's head over to vibe.powerapps.com.
We can start with a prompt like this:
Create a modern customer service application called Service Request Cockpit.
The application should include a dashboard showing open requests, overdue requests, and requests by priority.
Create a searchable request list displaying the request number, customer, assigned agent, status, and priority.
Selecting a request should open a detail screen with the description, customer information, and related order status.
Use realistic fictional sample data. For now, the order-status information should be mocked.
The application should have a clean, modern desktop interface.
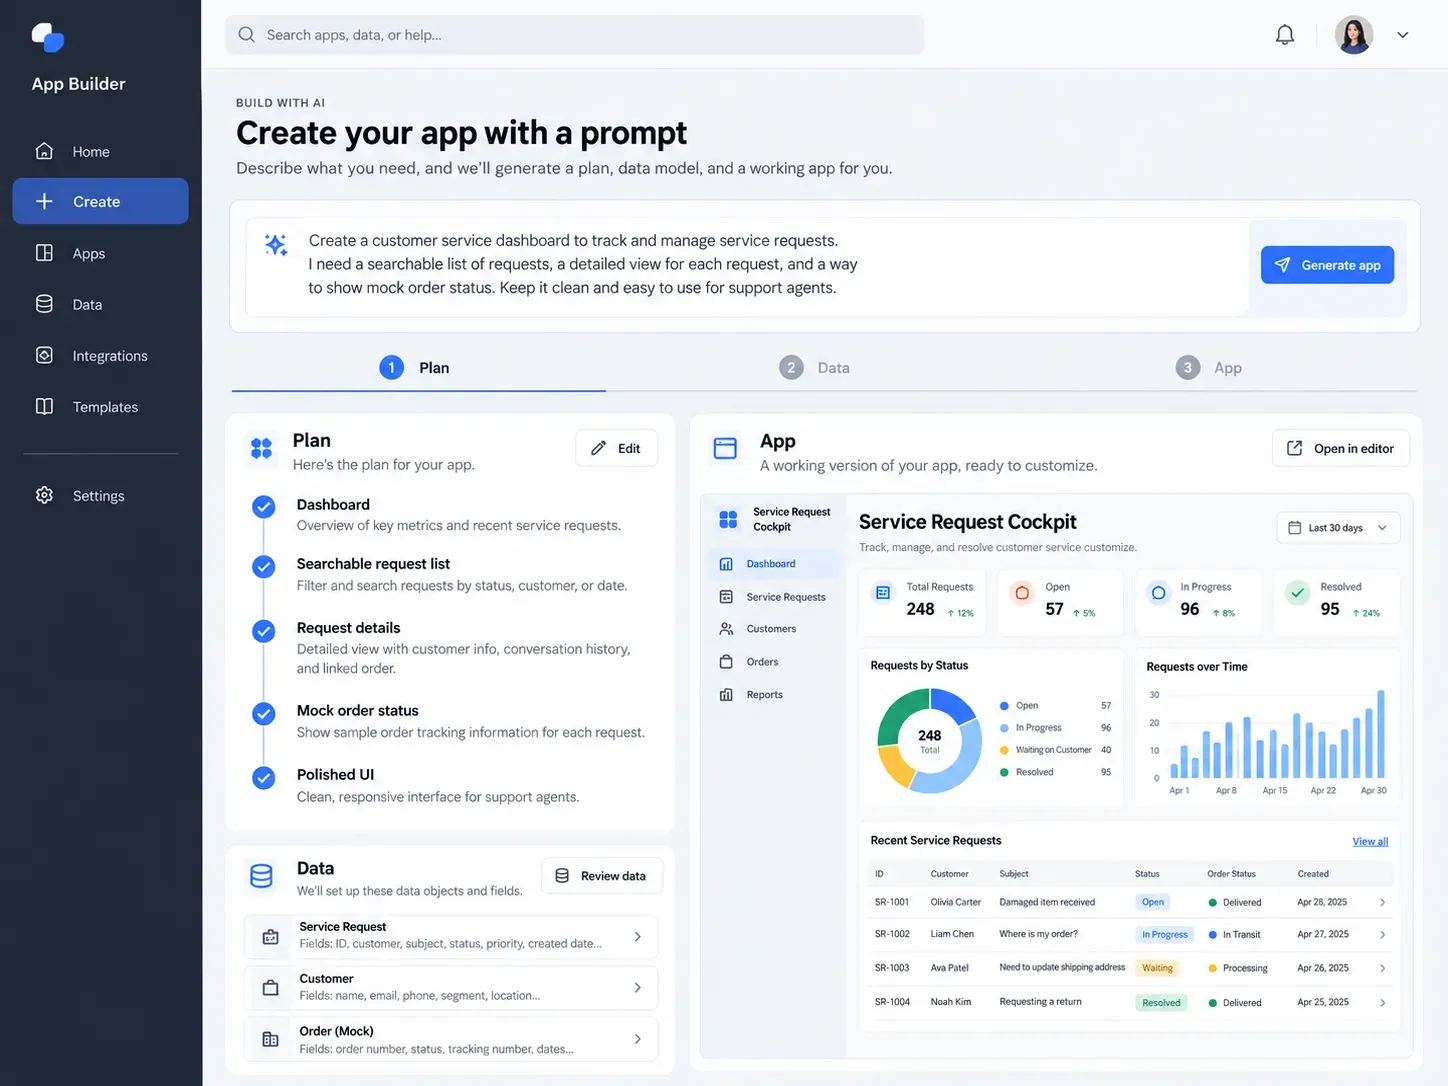
In Plan mode, Vibe generates a proposed application plan that we can review before creating anything.
This is an important step.
Just because AI suggests a feature doesn't mean we actually need it.
We can review the plan, remove unnecessary functionality, add missing requirements, and only then approve the application generation.
After accepting the plan, Vibe generates the application and, where necessary, a proposed data model.
We can now interact with the result.
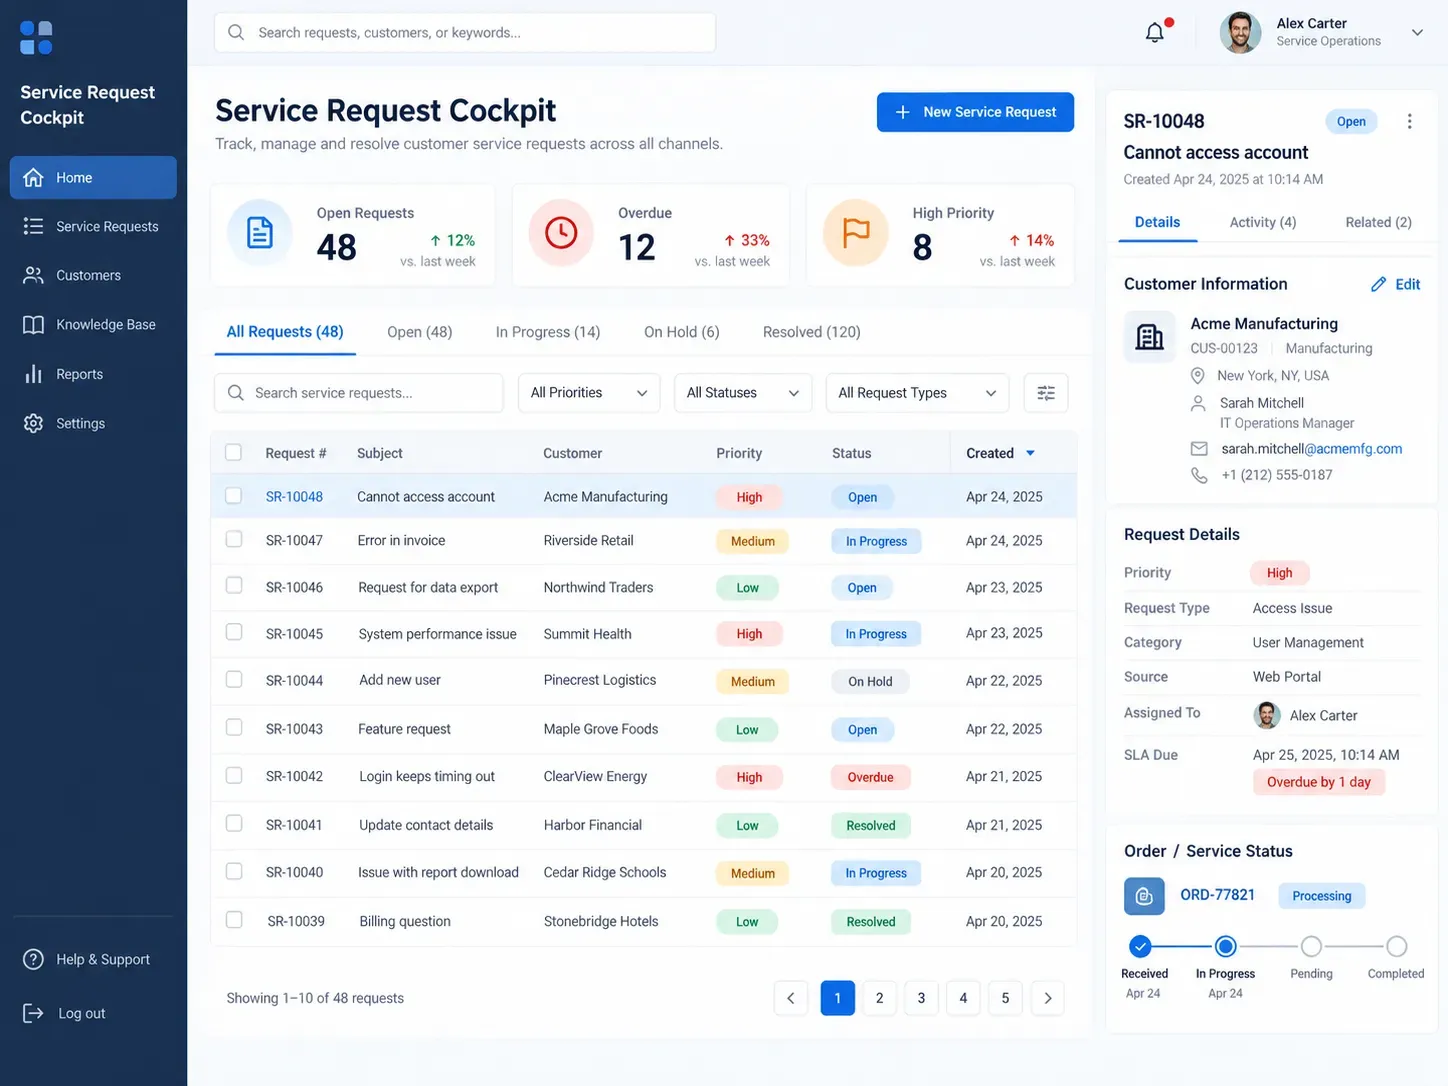
Perhaps the business wants overdue requests highlighted in red.
Or maybe they would prefer the customer details on the right side of the screen.
We can simply describe those changes and let Vibe update the application.
That's the real advantage here.
We're validating the user experience before investing too much time in the technical implementation.
But What About the Data?
Vibe can also generate draft tables with sample records.
These are especially useful for showing how the application behaves with realistic information.
However, draft data tables exist in memory until they are explicitly published.
And even if we publish them into Dataverse, we still need to consider whether the generated data model makes sense for our actual solution.
For example, what if our organization already uses Dynamics 365 Customer Service?
We probably don't want to introduce a completely new customer table when the required information already exists in Dataverse.
That's why, for this example, I would keep the Vibe application focused on the interface and functionality.
We'll deal with the real business data once we move into development.
Step 2 — Turning Our Vibe App into a Code App
Now comes the part I find particularly exciting.
Let's assume the business is happy with the prototype.
The screens look good, the navigation makes sense, and we've agreed on the requirements.
Normally, this is where a developer would start implementing the application.
But what if we could use the application we've already generated as our starting point?
With the new Vibe-to-Code conversion capability, we can!
Power Apps Vibe allows us to download the generated source code and continue developing it as a Power Apps Code App.
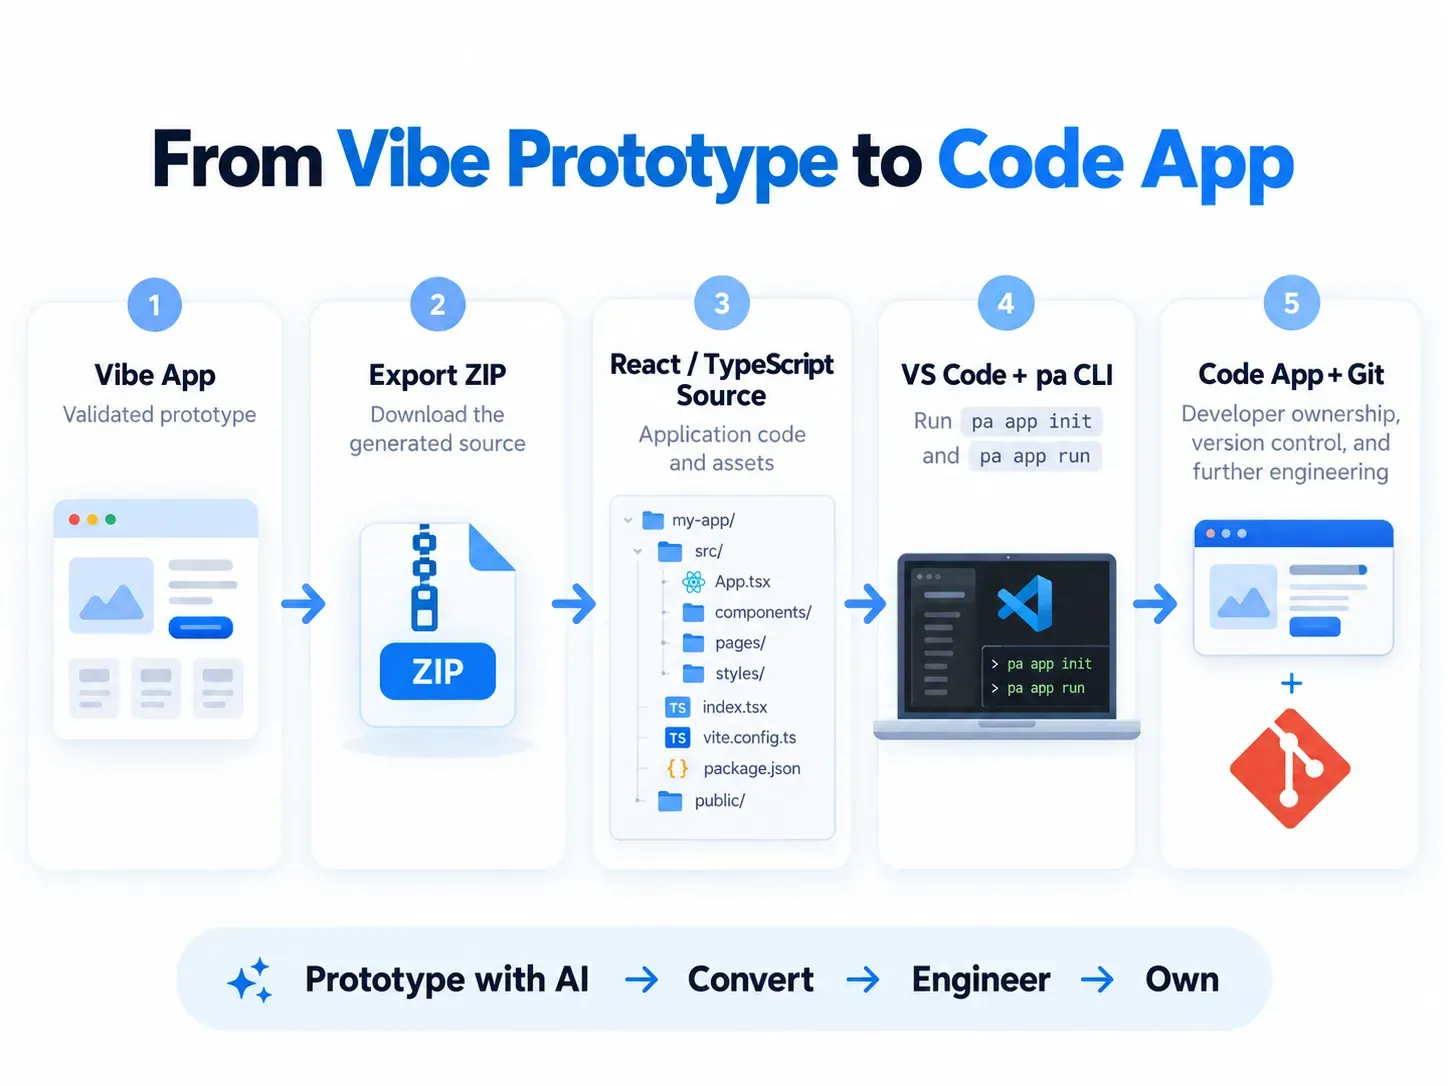
What Are Code Apps?
If you haven't worked with Code Apps before, they're a relatively new addition to the Power Platform ecosystem.
They allow developers to create applications using familiar web technologies such as React, TypeScript, and Vite, while hosting the resulting application within Power Platform.
Think of it as combining the flexibility of traditional web development with the identity, connectors, and governance capabilities of Power Platform.
Unlike a traditional Canvas App, where most development happens inside Power Apps Studio, Code Apps are developed using a code-first workflow.
We can use Git, work in Visual Studio Code, install npm packages, create reusable components, write automated tests, and use GitHub Copilot to assist with development.
José has already covered Code Apps in detail in his Code Apps tutorial series, so I won't repeat all of that here.
What I want to focus on is the possibility of taking an AI-generated prototype and continuing its development using those tools.
Preparing Our Development Environment
Before we start, we'll need a few things:
- Visual Studio Code or another preferred IDE.
- Node.js LTS and npm.
- Git for source control.
- The Power Apps CLI.
- A Power Platform environment with Code Apps enabled.
- The appropriate environment permissions and Power Apps licensing.
- Optionally, GitHub Copilot for AI-assisted development.
For this walkthrough, we'll use the new npm-based Power Apps CLI, which became generally available in August 2026.
If you've worked with Code Apps before, you might remember commands such as pac code or npx power-apps.
The new CLI introduces the pa command and a more consistent structure for managing Code Apps.
Let's install it:
npm install -g @microsoft/power-apps-cliNext, we authenticate:
pa auth login
pa auth status
With that done, we're ready to work with the exported application.
Downloading the Vibe Application
Open the application in Vibe, select Edit, and choose Download source.
This downloads a ZIP file containing the generated project.
Extract the file and navigate to the application folder inside the apps directory.
Open that folder in Visual Studio Code.
We now have access to the actual source code.
And this is where things start getting interesting.
We can inspect the generated components, review the dependencies, and understand how the application was constructed.
However, before initializing the Code App, there is one important configuration step.
Preparing the Configuration
The exported project can contain a power.config.json file with information about the application's existing data sources and connections.
Before removing it, check whether it contains connectionReferences or databaseReferences.
If those properties exist, save them and the properties that follow them temporarily.
We need to preserve that information because initializing the Code App creates a new configuration file.
After backing up the relevant properties, remove the original power.config.json.
Microsoft's September conversion guide also includes a dependency installation step for the exported project:
npm install --save-dev "oxlint-tsgolint@^7.0.2001" --allow-remote=allFollow the dependency setup required by your exported project, then initialize the application:
pa app initThe CLI asks us to select the Power Platform environment and provide the application name.
If the original application depends on existing Dataverse resources, make sure the selected environment contains those dependencies.
Once initialization finishes, restore the connection and database configuration we saved earlier into the new power.config.json.
We can now start the application locally:
pa app runOpen the Local Play URL using the same browser profile associated with your Power Platform account.
If everything is configured correctly, we should now have our converted application running locally!
The interface we generated in Vibe is now available in a normal development environment.
Pretty nice, isn't it?
One thing worth remembering is that the converted Code App is independent of the original Vibe application.
Any changes we make in Visual Studio Code won't synchronize back into the original Vibe plan.
This is an important distinction, but it also establishes a clear development boundary.
Vibe was our prototyping environment. Now that we're moving into actual development, Git and our development process become the source of truth.
Step 3 — Making the Generated Code Maintainable
Before we start connecting everything to real systems, I would spend some time reviewing the generated code.
Why?
Because generating code and maintaining code are two very different things.
The application might work perfectly, but that doesn't automatically mean it follows the architecture we would normally use for a production application.
For example, we should inspect how the generated code handles state, data access, reusable components, and errors.
If the UI contains hardcoded sample data, I would separate that data access from the components before introducing actual integrations.
Instead of allowing every component to retrieve data independently, we could introduce a service layer:
src/
  components/
  pages/
  services/
  models/
  generated/
The exact structure depends on the exported project and how complex the application becomes.
The goal isn't to reorganize everything simply because we can.
It's to establish a structure that other developers can understand.
Using GitHub Copilot
This is also an excellent opportunity to use GitHub Copilot.
Instead of asking it to generate another complete application, we can ask it to help improve the code we already have.
For example:
Review the generated application and identify where sample data is accessed directly from React components.
Refactor the application so that data access happens through a dedicated service layer.
Preserve the existing UI and behavior, and do not modify generated Power Apps service files.
Explain the changes and show the resulting diff before continuing.
This is a much more controlled use of AI.
We're not asking Copilot to make every architectural decision for us.
We're giving it context, defining the boundaries, and reviewing what it produces.
And because the application is stored in Git, we can inspect changes, use branches, and revert something if necessary.
Remember, AI is an excellent development assistant.
But we should still understand the code we're deploying.
Step 4 — Connecting the Application to Dataverse
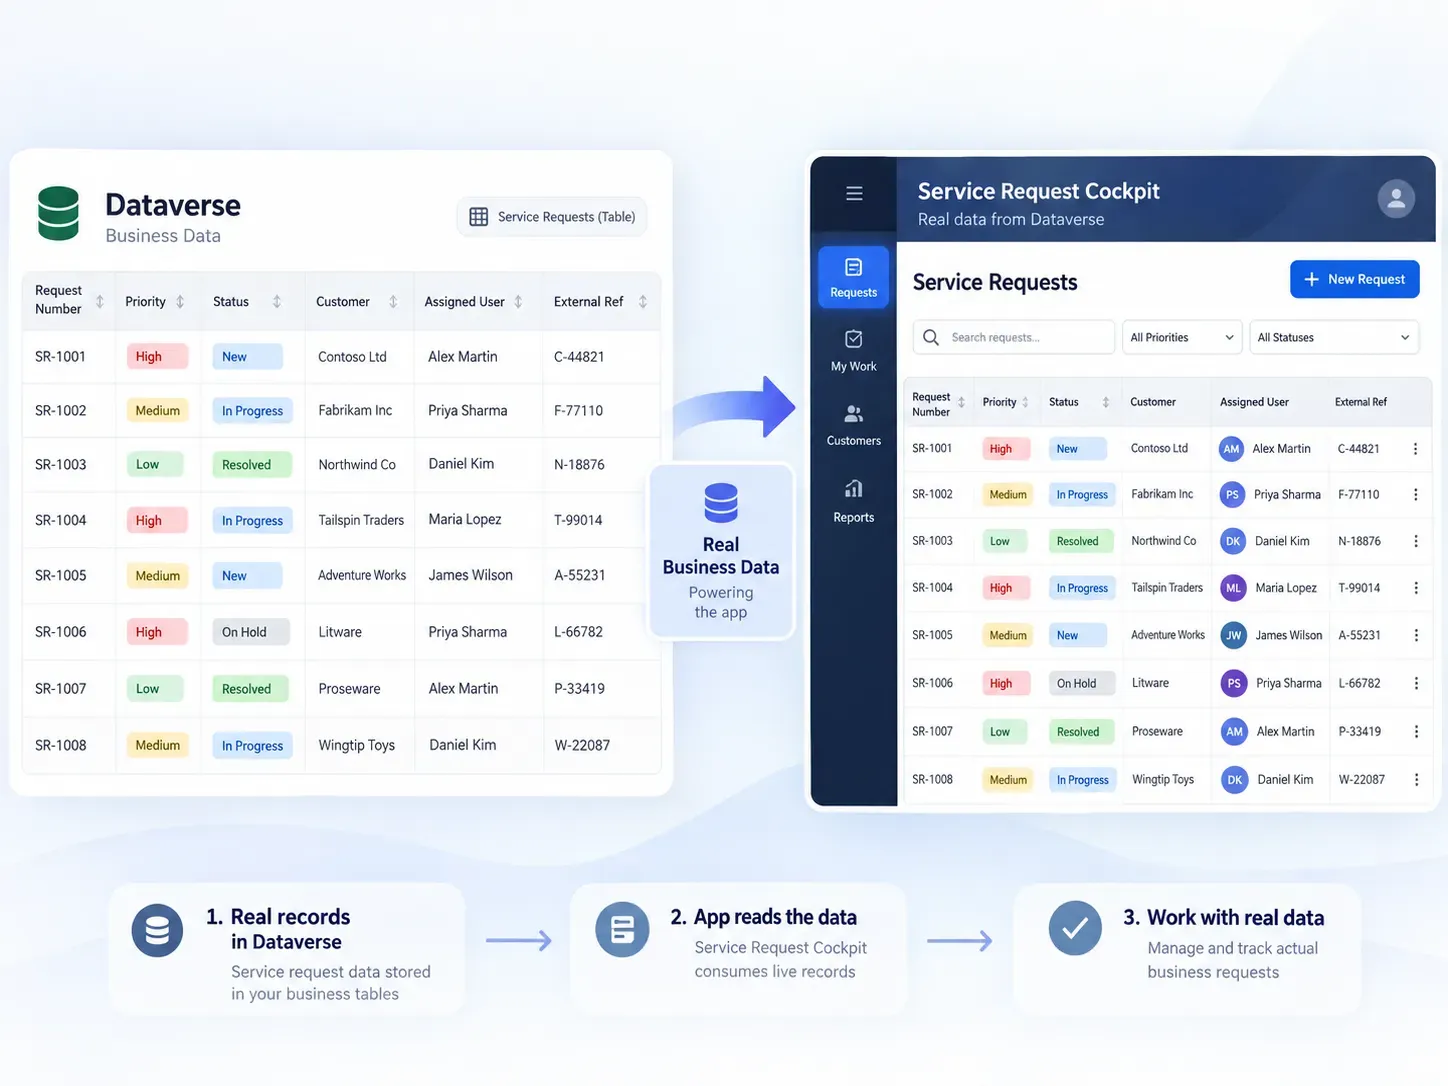
Now let's replace our sample data with something useful.
Remember our Service Request Cockpit?
The request list currently contains fictional records generated for the prototype.
In a real implementation, these records might come from Dynamics 365 Customer Service or a custom Dataverse table.
For this example, let's assume we've created a Service Request table containing:
- Request Number
- Title
- Priority
- Status
- Customer
- Assigned User
- External Order Reference
If you're working with Dynamics 365 Customer Service, you could instead reuse the existing Case table and adapt the UI accordingly.
Personally, I would always check whether an existing table can satisfy the requirements before introducing a new one.
Adding Dataverse to Our Code App
With the table available in the development environment, we can add it to our Code App using the Power Apps CLI:
pa app add data-source \
  --connector dataverse \
  --table <table-logical-name>
Replace the placeholder with your table's actual logical name.
The CLI retrieves the schema and generates the corresponding TypeScript models and services.
This is particularly useful because we don't have to manually write HTTP calls for every Dataverse operation.
We can work with generated, typed services that expose operations such as creating, retrieving, updating, and deleting records.
The next step is replacing the mock service that supplies our request list with the generated Dataverse service.
And because we separated the data access from the UI earlier, that change should be easier to manage.
At least, that's the idea!
Don't Forget About Delegation and Performance
There is something I'd like to emphasize here.
Imagine we ask Copilot to add a search field to the request list.
It generates the code, we test it with 20 records, and everything works perfectly.
Great!
But what happens when our Dataverse table contains 50,000 records?
If the application retrieves only a limited number of records and then filters them in memory, users might not see the results they're expecting.
Code Apps support Dataverse filtering, sorting, and paging through the generated services.
We should use those capabilities appropriately rather than loading everything into the browser.
This is a perfect example of why AI-generated code still needs proper technical review.
A feature working with sample data doesn't necessarily mean it will behave correctly in production.
What Happens When the Schema Changes?
Suppose someone adds a new column to the Service Request table.
We don't have to manually update every generated service definition.
We can refresh the data source:
pa app refresh data-source \
  --name <data-source-name>
The CLI regenerates the relevant service files based on the updated schema.
This is another reason to keep generated code separate from our custom application logic.
We don't want important business logic disappearing when we regenerate the data-access layer.
Step 5 — Connecting to External Systems
Now we're getting somewhere!
Our application has a modern UI and displays real Dataverse information.
But we still have one requirement left.
The customer service agent wants to retrieve the current status of a related order.
And that information lives in an external ERP system.
How should we connect to it?
Well, since we're developing a React application, we could simply make an HTTP request to the ERP API, right?
Technically, yes.
But is that really what we want?
Where would we handle authentication? What about API keys and secrets? And what happens when the ERP changes its API or becomes temporarily unavailable?
Remember, our React application runs in the user's browser. We certainly don't want to expose sensitive credentials or integration details there.
This is where Power Platform connectors and Azure Logic Apps become interesting.
Choosing the Integration Architecture
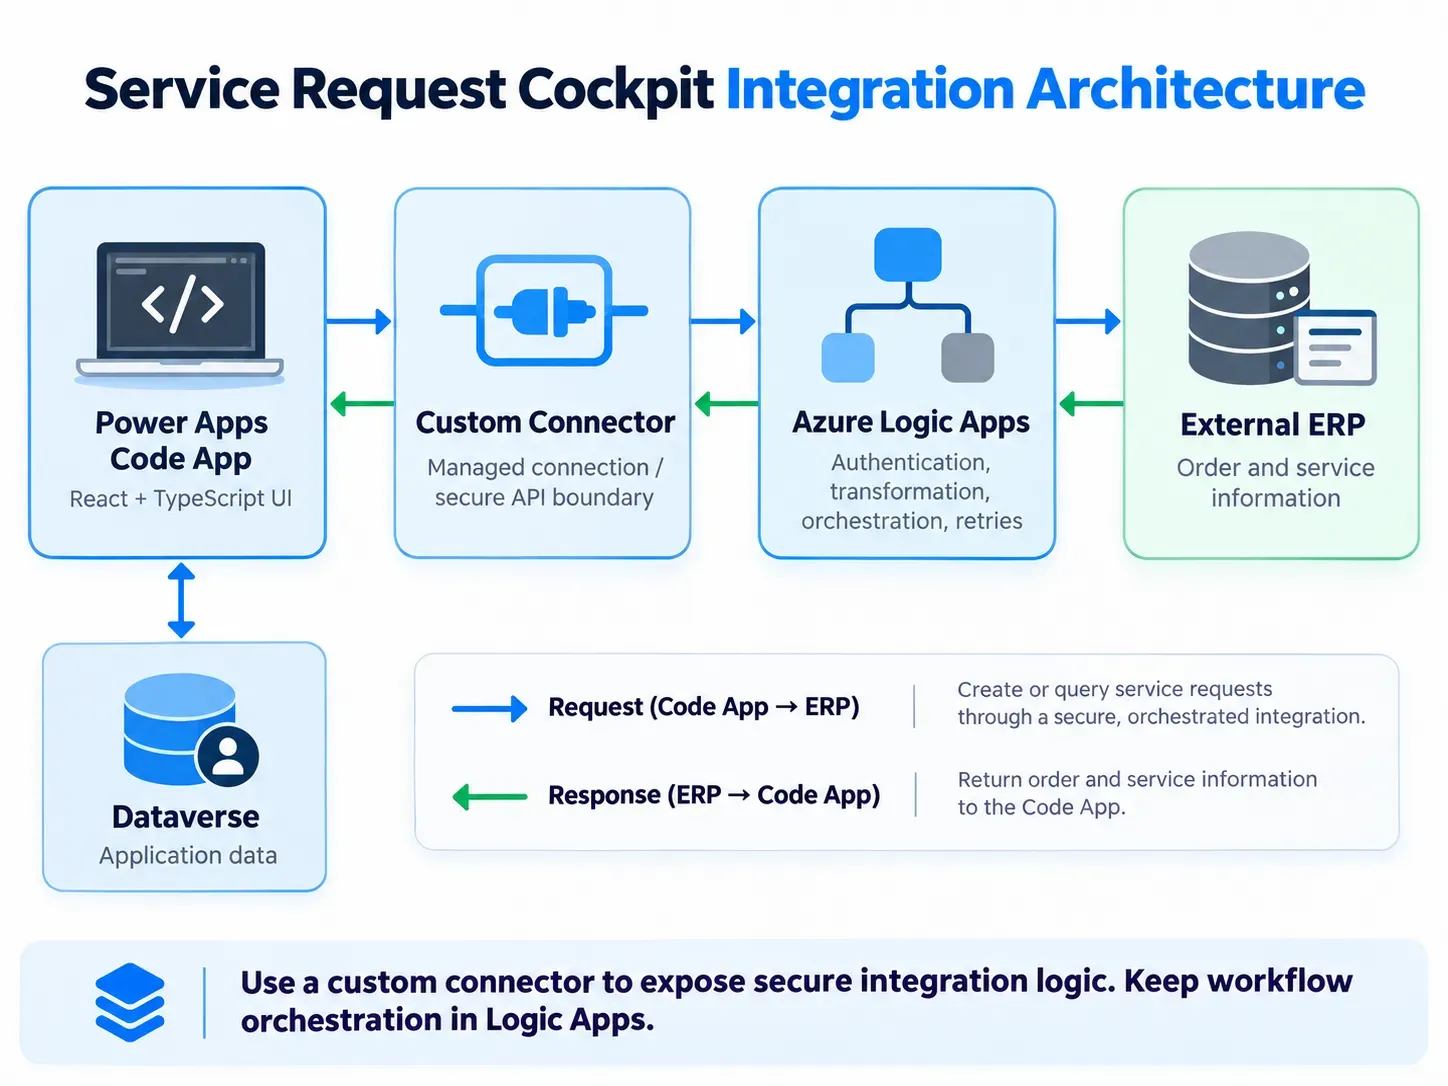
For our example, I would use a Power Platform Custom Connector to expose an Azure Logic App that handles communication with the ERP.
The architecture would look something like this:
Why this approach?
Because I don't want our React application to worry about how the ERP works internally.
The Code App should simply request the order information it needs and receive a response it understands.
The custom connector provides a defined interface for calling the integration through Power Platform, while the Logic App handles the ERP-specific logic.
This includes things like transforming data, orchestrating requests, handling errors, and implementing retry policies.
And if we need to change the ERP integration later, we can update the Logic App without necessarily changing our application.
Of course, this isn't the only possible architecture.
If an existing connector already provides the functionality we need, I would consider using it directly. And if the integration requires more complex API management, Azure API Management might also be worth considering.
But for our Service Request Cockpit, a custom connector and a Logic App provide a nice separation of responsibilities. If you want to know more about custom connectors, you may want to take a look at this post:
 José Martínez Lago

Creating the Logic App
Let's assume we create a Logic App called GetExternalOrderStatus.
The Logic App receives an order reference, retrieves the corresponding information from the ERP, and returns a response containing the current status, estimated delivery date, and last update.
For example:
{
  "orderReference": "ORD-77821",
  "status": "In Transit",
  "estimatedDelivery": "2026-09-26",
  "lastUpdated": "2026-09-23T08:30:00Z"
}
Nothing particularly complicated from the application's perspective.
However, the Logic App might be doing considerably more work behind the scenes.
It could authenticate against the ERP, call multiple endpoints, combine the responses, and transform the data into a consistent format.
This is exactly the kind of logic I prefer to keep outside the frontend application.
For our example, a request-triggered Logic App is enough to demonstrate the concept.
Exposing the Logic App Through a Custom Connector
Now we need to make our Logic App available to the Code App.
This is where the custom connector comes in.
A custom connector allows us to expose an API through Power Platform using a defined set of operations, authentication settings, and request/response schemas.
For a Consumption Logic App that starts with a Request trigger, Azure provides an option to export the workflow as a custom connector for Power Apps.
Alternatively, we can create a custom connector based on an OpenAPI definition of our integration endpoint.
Either way, we need to configure the connector's authentication and permissions correctly. Simply creating a custom connector doesn't automatically make an unsecured API secure.
For our example, we'll expose an operation called GetOrderStatus that accepts an order reference and returns the information retrieved from the ERP.
Once the connector is available in our Power Platform environment, we can use it from the Code App.
Adding the Custom Connector to Our Code App
One of the nice additions to the new Power Apps CLI is the ability to discover connectors and manage connections directly from the terminal.
We can start by listing the connectors available in our environment:
pa connector listOr search for the connector we created:
pa connector list --search "Order"Once we identify its connector ID, we can create a connection:
pa connection create --connector <connector-id>Depending on the authentication configuration, we'll need to complete the corresponding authentication process.
The CLI returns a connection ID that we can use to add the connector to our application:
pa app add data-source \
  --connector <connector-id> \
  --connection-id <connection-id>
Just like with our Dataverse connection, the Power Apps CLI generates TypeScript services and models based on the connector definition.
This means we don't have to manually implement the HTTP communication with our Logic App.
Instead, we can use the generated service to invoke the connector operation.
For our example, we can update the service responsible for retrieving external order information so that it calls GetOrderStatus through the generated connector service.
The exact method signature depends on the connector's API definition.
And because we separated data access from our React components earlier, we shouldn't need to modify the entire application to make this change.
Pretty convenient, isn't it?
For a solution that will move between environments, I would also consider using connection references rather than binding everything directly to development connections.
This allows the appropriate connection to be configured for each environment as part of our ALM process.
What Does This Mean for the User?
Let's return to our Service Request Cockpit.
An agent opens a service request, selects the related order, and clicks Refresh Status.
The application calls our custom connector, which invokes the Logic App.
The Logic App retrieves the latest information from the ERP and returns it to the application.
And the agent sees something like this:
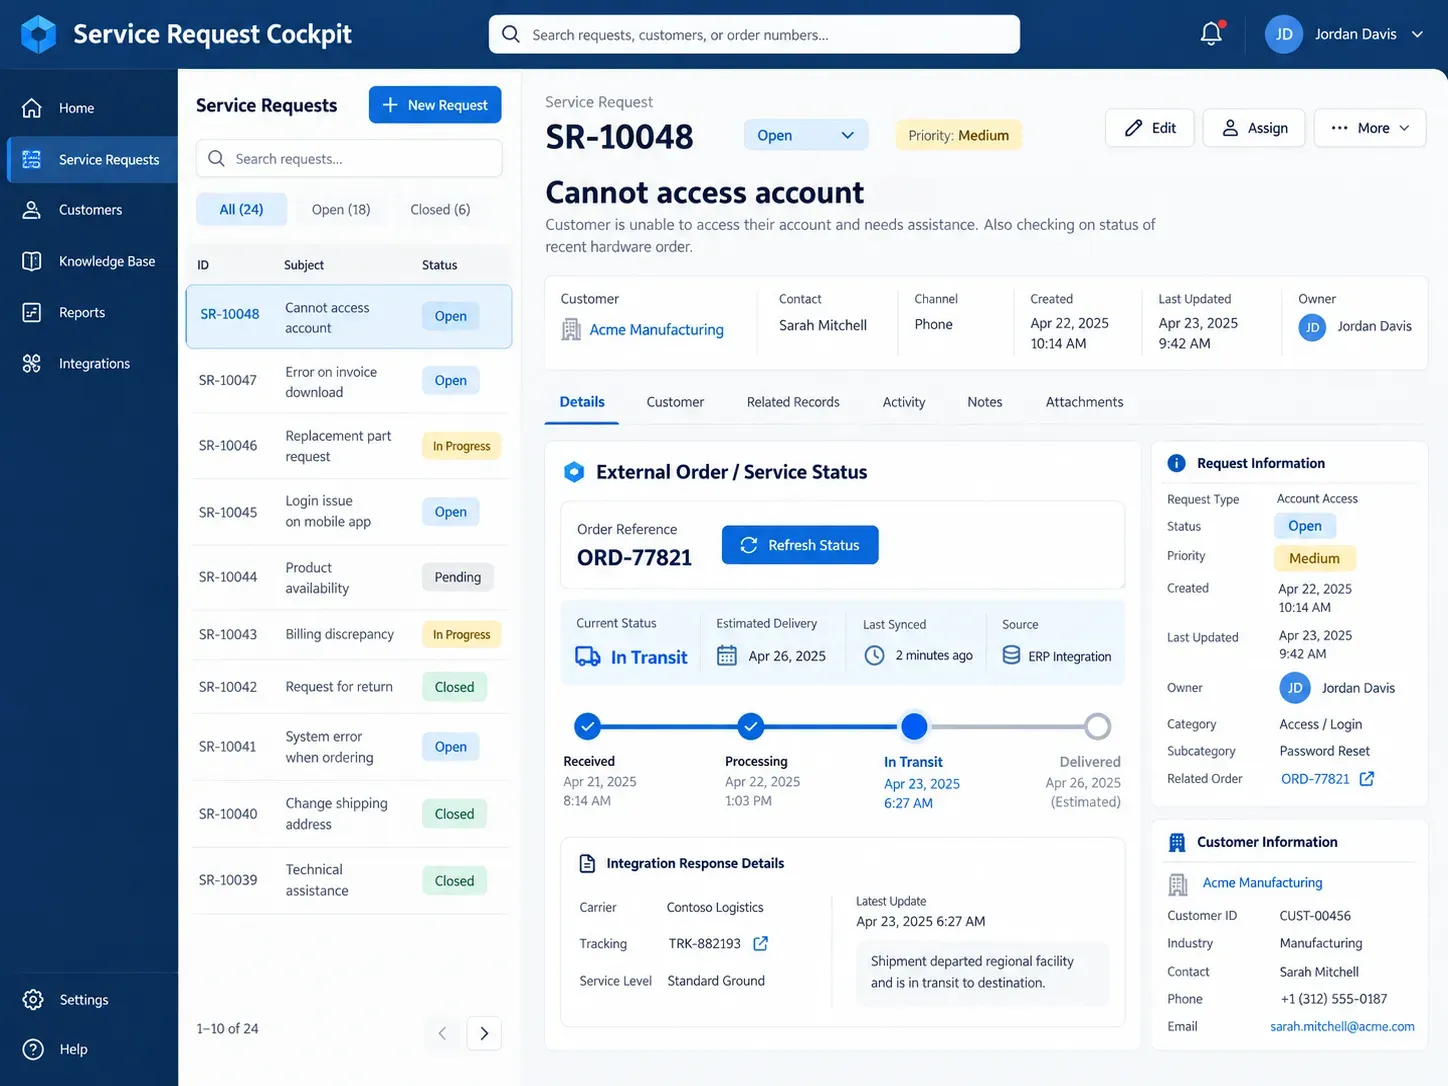
The user doesn't need to know whether the data came from SAP, Dynamics 365 Finance, or another ERP system.
They simply see the information they need.
And that's exactly how I think it should work.
And What About Security?
There is one important thing we shouldn't overlook.
Just because we're using a custom connector doesn't mean security is automatically taken care of.
We still need to configure authentication, control who can invoke the integration, and make sure that users only have access to information they're authorized to retrieve.
For example, we shouldn't simply expose a Logic App's SAS-authenticated callback URL directly in our React code.
Anything included in the frontend application should be considered accessible to the user.
Instead, we should use properly secured endpoints and configure the custom connector to authenticate appropriately.
For more advanced scenarios, Microsoft Entra ID and Azure API Management can provide additional authentication and API protection capabilities.
We also need to remember that Power Platform governance still applies.
DLP policies, connection permissions, environment security, and connector sharing are all part of the solution.
Code-first development gives us more flexibility, but it doesn't remove the responsibility of designing secure integrations.
And with that, our application has made another important step forward.
We've moved from an AI-generated mockup with fictional data to a Code App that uses Dataverse and communicates with an external business system.
Now we need to make sure we can deploy and maintain it properly!
Step 6 — Deploying the Application Properly
At this point, our application has evolved quite a bit.
We started with a prompt.
We generated a mockup, validated the experience, converted it into a Code App, replaced sample data with Dataverse, and added an external integration.
Sounds like we're ready to publish!
Well, almost.
We still need to think about deployment and application lifecycle management.
Source Control Comes First
One of the biggest advantages of Code Apps is that we can manage the source code using Git.
This allows multiple developers to collaborate, review changes through pull requests, and maintain a history of the application.
I would recommend treating the exported application as a normal software project from the moment we convert it.
That means having a repository, a branching strategy, a README, and a process for reviewing changes.
For example, each new feature could be implemented in a separate branch, tested, reviewed, and merged before deployment.
This becomes especially important when using AI-assisted development.
If Copilot changes five components while implementing one small feature, we need to understand why those components changed.
Being able to generate changes quickly is great.
Being able to review them is even better.
Publishing into a Power Platform Solution
Once we've built the application, we can publish it using the Power Apps CLI.
First, build the React application:
npm run buildThen publish it into a specific Power Platform solution:
pa app push --solution-id <solution-guid>The solution must exist in the selected environment, and the value needs to be its GUID rather than its display name.
If we don't know the solution ID, the new CLI provides a convenient command:
pa solution listThis is one of the useful improvements introduced with the generally available npm-based CLI.
Once published, the Code App becomes part of the Power Platform solution.
This means we can use standard solution-based ALM to move the application and its dependencies between environments.
Development, Test, and Production
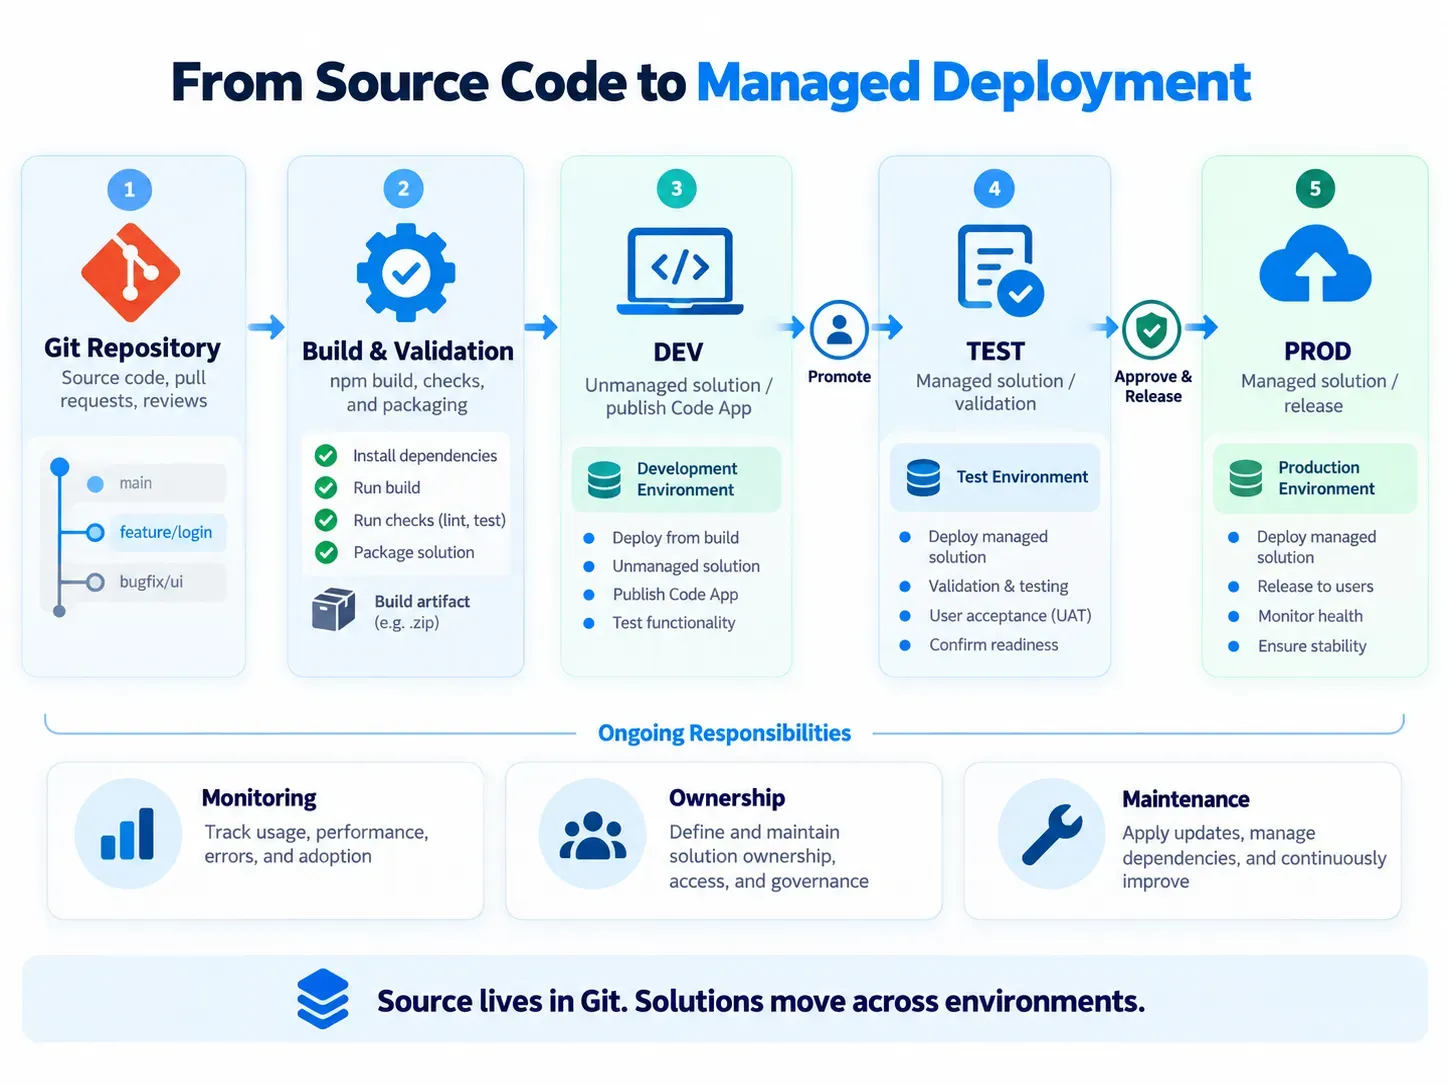
For a proper implementation, I would use separate environments:
DEV → TEST → PROD
Developers work with the source code and publish to the development environment.
Once the application has been validated, we export the solution as managed and promote it into the next environment.
This can be done using Power Platform Pipelines or automated through Azure DevOps.
The distinction is important.
We're not simply rebuilding the application and pushing whatever happens to be on our laptop directly into production.
We're promoting a controlled solution artifact containing the version we want to release.
For more advanced setups, the Power Apps CLI also supports service-principal authentication for unattended publishing.
That allows pipelines to publish updates without relying on an interactive developer account.
Of course, the service principal must have the appropriate environment permissions and edit access to the existing Code App.
If you're interested in this process, José has already written a detailed article about CI/CD for Code Apps with Azure DevOps and managed solutions.
Step 7 — Who's Going to Maintain All of This?
We've reached production.
The users are happy, the application looks great, and all our integrations are working.
Time to celebrate?
Absolutely!
But this is also where the real responsibility starts.
What happens when someone changes the Dataverse schema?
What if the ERP introduces a new API version?
Or what if a developer asks Copilot to modify a feature and accidentally breaks something else?
Who's going to fix it?
This is the part that sometimes gets overlooked when discussing AI-generated applications.
Generating an initial application is becoming increasingly easy.
Maintaining it still requires proper engineering practices.
For our Service Request Cockpit, I would want to have at least the following:
Application Ownership
Every application should have a business owner and a technical owner.
Someone needs to decide which changes make sense, while someone else needs to understand how those changes affect the application and its integrations.
Testing and Code Reviews
Automated tests should cover the important functionality.
We should also validate builds and review code before merging changes into our main branch.
This applies equally to code generated by GitHub Copilot.
Dependency Management
Our application uses npm packages, generated Power Apps services, and external integrations.
These dependencies need to be maintained.
We should review package updates, identify security issues, and regenerate service definitions when their underlying contracts change.
Monitoring
Code Apps can integrate with Azure Application Insights to provide information about application performance and network activity.
We should also monitor our Logic App runs and external API calls so that integration failures don't go unnoticed. Azure Monitor and Application Insights can help us track execution failures, performance, and integration behavior.
Monitoring is particularly important when users depend on the application for daily business processes.
And perhaps most importantly, somebody needs to be responsible for responding when something goes wrong.
Because a dashboard full of green indicators is only useful if someone notices when one of them turns red!
Should We Convert Every Vibe App into a Code App?
Now, after going through all of this, you might be thinking:
"This is great! Why don't we build every application like this?"
Well, that's a good question!
And the answer is that we probably shouldn't.
Code Apps provide an enormous amount of flexibility, but that flexibility comes with additional responsibility.
We're managing source code, build processes, packages, deployment pipelines, and application architecture.
For a simple form-based application working with Dataverse, a model-driven app might be a much better choice.
For a straightforward application that requires a highly customized interface but little traditional coding, a Canvas App might make more sense. If you want to know more about them, take a look at the following post:
 Stephan Charles Nielson

Code Apps become particularly interesting when we need more control over the user experience, want to work with familiar development frameworks, or have requirements that benefit from a professional code-first workflow.
There's also something else we should consider.
Just because Vibe generated the code doesn't mean we have to keep all of it.
Sometimes the most valuable output of the prototyping process isn't the generated source code.
It's the validated requirements, the agreed user experience, and a much better understanding of what the business actually needs.
If the generated application has architectural problems, starting fresh with a clean React project might be a better decision than spending days refactoring code we didn't really need.
The conversion capability gives us another option.
It doesn't eliminate the need to make that decision.
In Summary
I think Power Apps Vibe introduces an interesting new approach to application development.
Instead of spending a significant amount of time discussing how an application should look, we can generate an interactive prototype, refine it with business users, and validate requirements much earlier.
And with the ability to convert a Vibe application into a Power Apps Code App, we now have a path to continue developing that application using familiar professional development tools.
We can work in Visual Studio Code, use Git and GitHub Copilot, connect to Dataverse, integrate external systems through Power Automate and Logic Apps, and deploy through standard Power Platform solutions.
But the most important thing to remember is that the transition from prototype to production is not simply a conversion command.
We still need to review the generated code, decide on the architecture, validate security, implement proper integrations, and establish an ALM process.
AI can help us get to a working application faster than ever before.
What it doesn't do is remove the responsibility of understanding and maintaining what we've built.
For me, that's the real opportunity here.
We can use Vibe to explore ideas quickly, involve business users earlier, and reduce the friction of getting started.
Then, when the application needs to become something more serious, we can move into Code Apps and apply the development practices we already know.
Prototype with AI. Develop with code. Deploy with ALM. Maintain with discipline.
And remember, just because the first version only took a few prompts doesn't mean the next version should!
Happy building!
Further Reading
If you want to explore the technologies discussed in this article, here are some useful resources.
On That's a Good Question:
- Power Apps Code Apps: Tutorial, Best Practices, and Production Patterns
- Power Apps Code Apps – Part 2: Connectors, Dataverse & Outlook
- Power Apps Code Apps – Part 3: CI/CD with Azure DevOps and Managed Solutions
Microsoft documentation: